从零开始使用GitHub+Hexo搭建个人博客
通过本文你能完成自己的个人博客搭建(无需个人主机、个人域名,免费),你的博客将拥有如下功能
- 分类功能
- 标签功能
- 搜索功能
- 评论功能
- 数据分析
- 博文发布
0. 安装Hexo
提前先安装node,node中包含npm工具,具体安装node这里不做描述
$ npm install hexo-cli -g安装完hexo-cli工具后,就可以开始创建博客了
$ hexo init ahern88_github_io
$ cd ahern88_github_io
$ npm install
到这里博客已经初始化好,可以启动查看demo页面了,先要在本地启动hexo的server
$ hexo server
INFO  Validating config
INFO  Start processing
INFO  Hexo is running at http://localhost:4000/ . Press Ctrl+C to stop.
在浏览器中打开 http://localhost:4000/ 就能看到默认页面了,不过可能你也发现了默认页面的主题样式并不是你喜欢的,下面我们看如何更换和安装主题。
1. 安装主题
hexo内置了默认的主题,如果想更换主题,首先点击这里查看所有主题,找到所需主题的源代码或压缩包解压到themes下完成安装
$ cd ahern88_github_io/themes
$ git clone https://github.com/lh1me/hexo-theme-aomori.git修改默认主题,修改根目录下_config.yml的theme配置
# Extensions
## Plugins: https://hexo.io/plugins/
## Themes: https://hexo.io/themes/
theme: hexo-theme-aomori完成主题安装后,通过hexo server重启服务查看效果
2. 搜索功能
搜索功能需要借助第三方商业公司algolia的search产品,数据量小搜索量不大个人项目够用,先上algolia注册个人账号
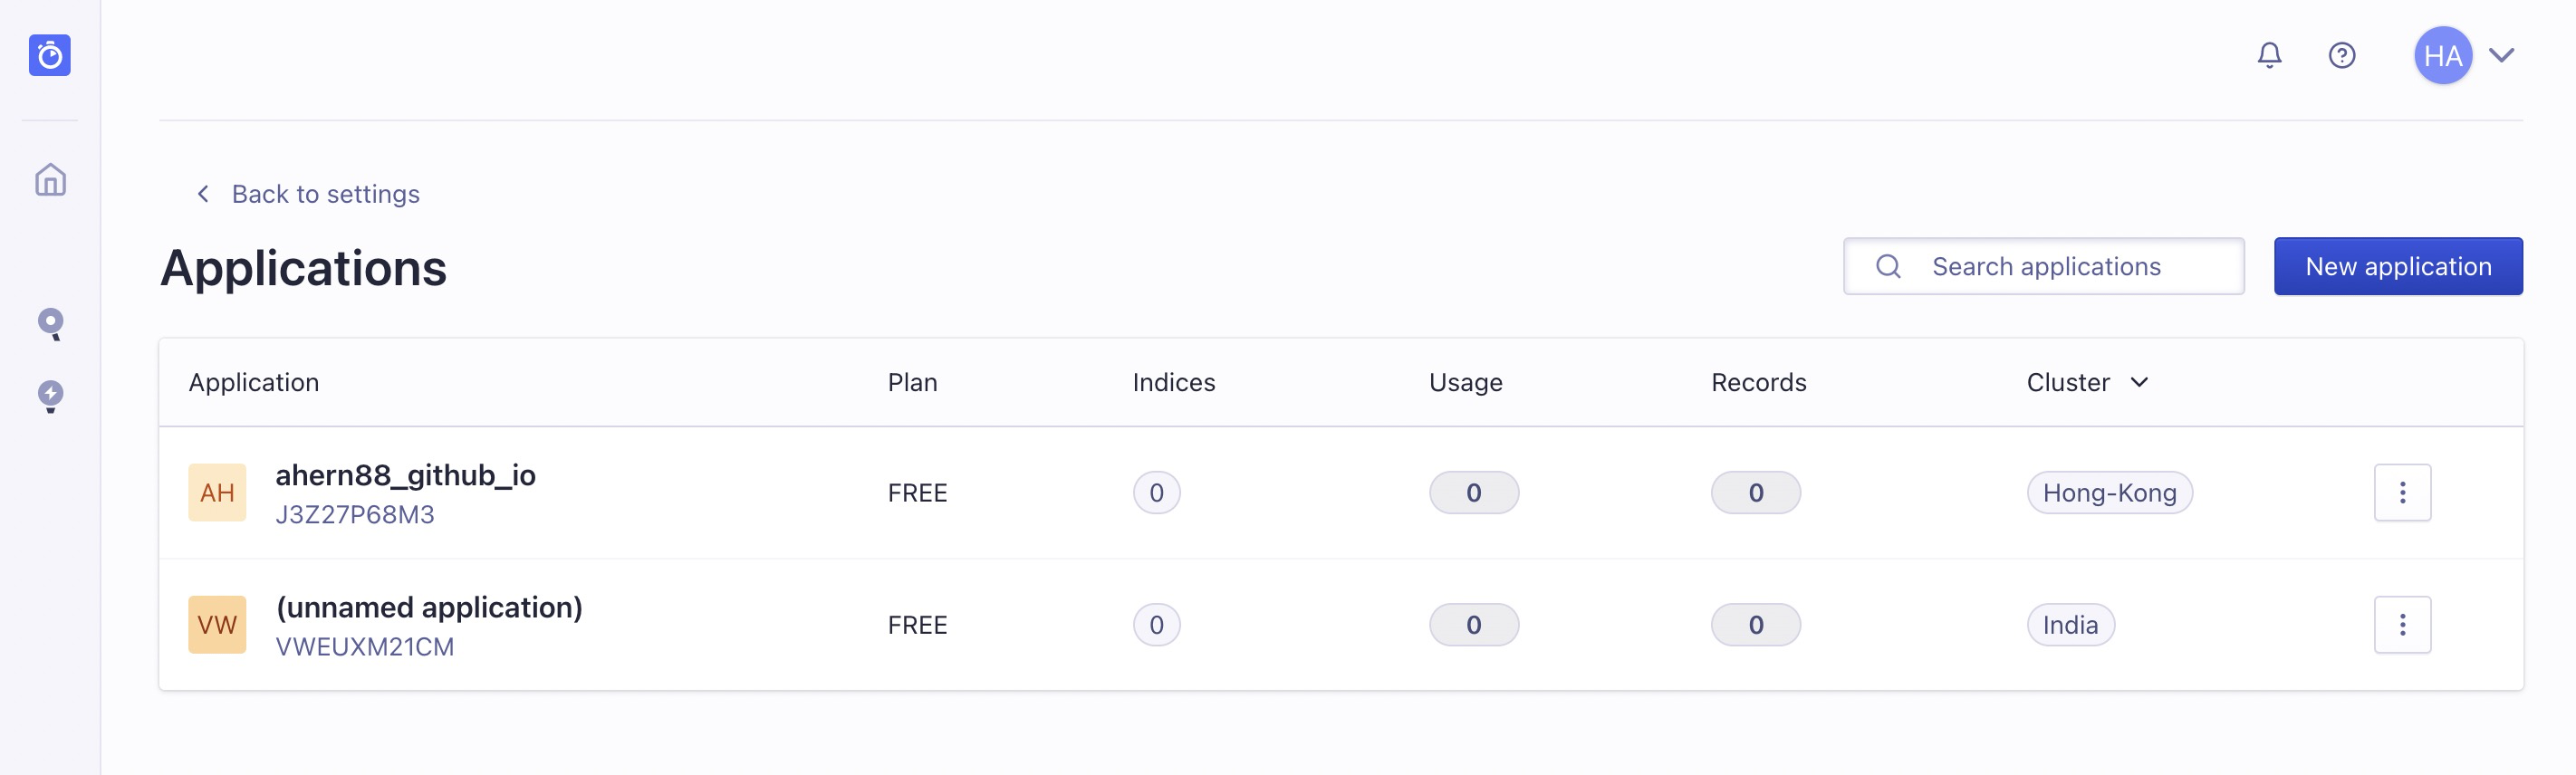
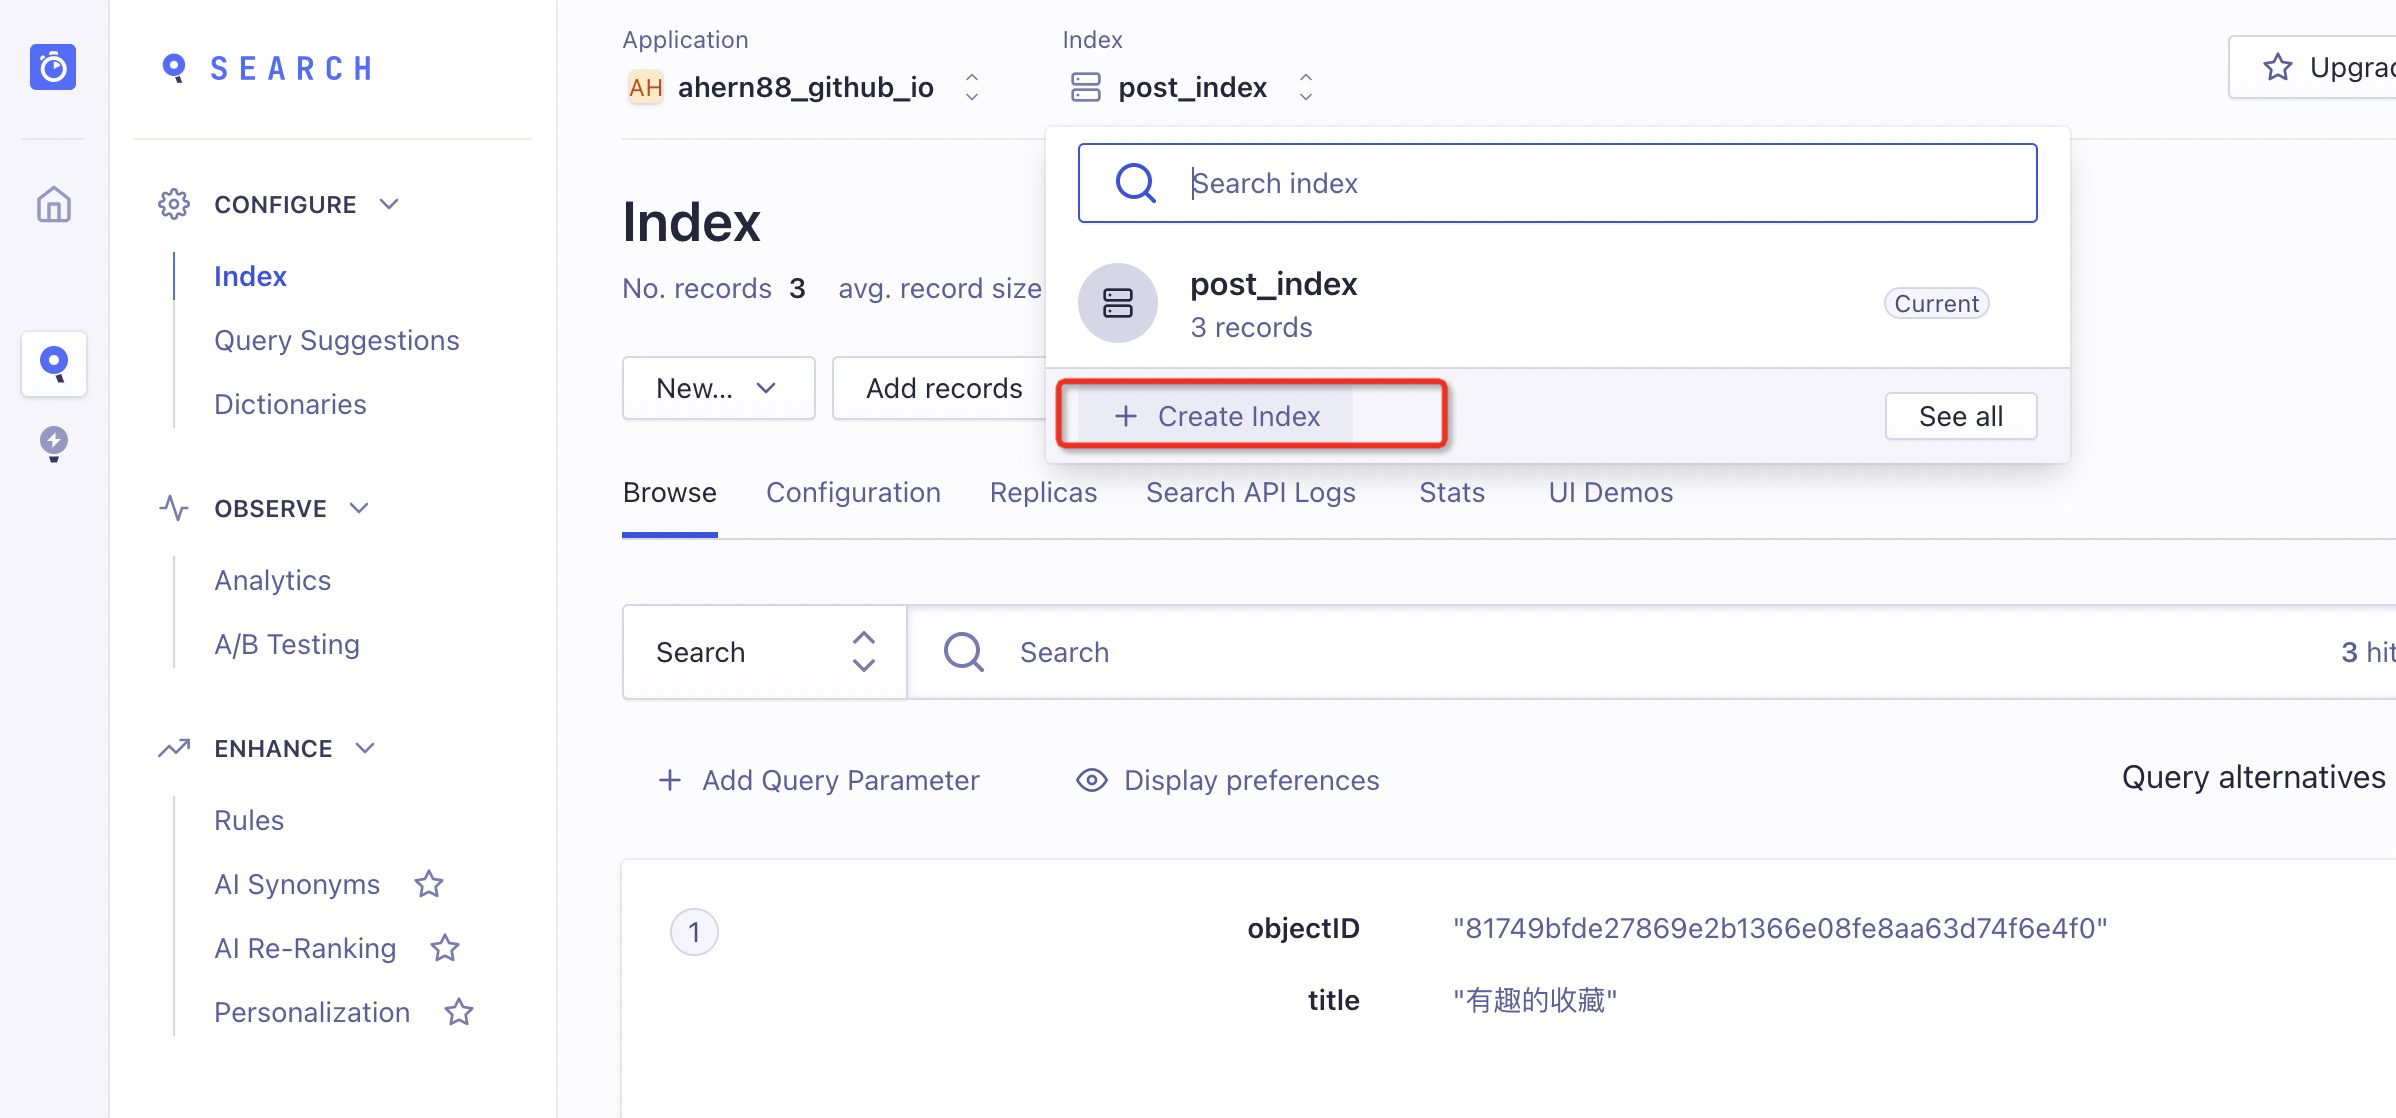
注册完进入管理后台后,先创建application,然后新增search功能下的index
在Settings中的Api Key功能模块,你能找到下面配置的相关参数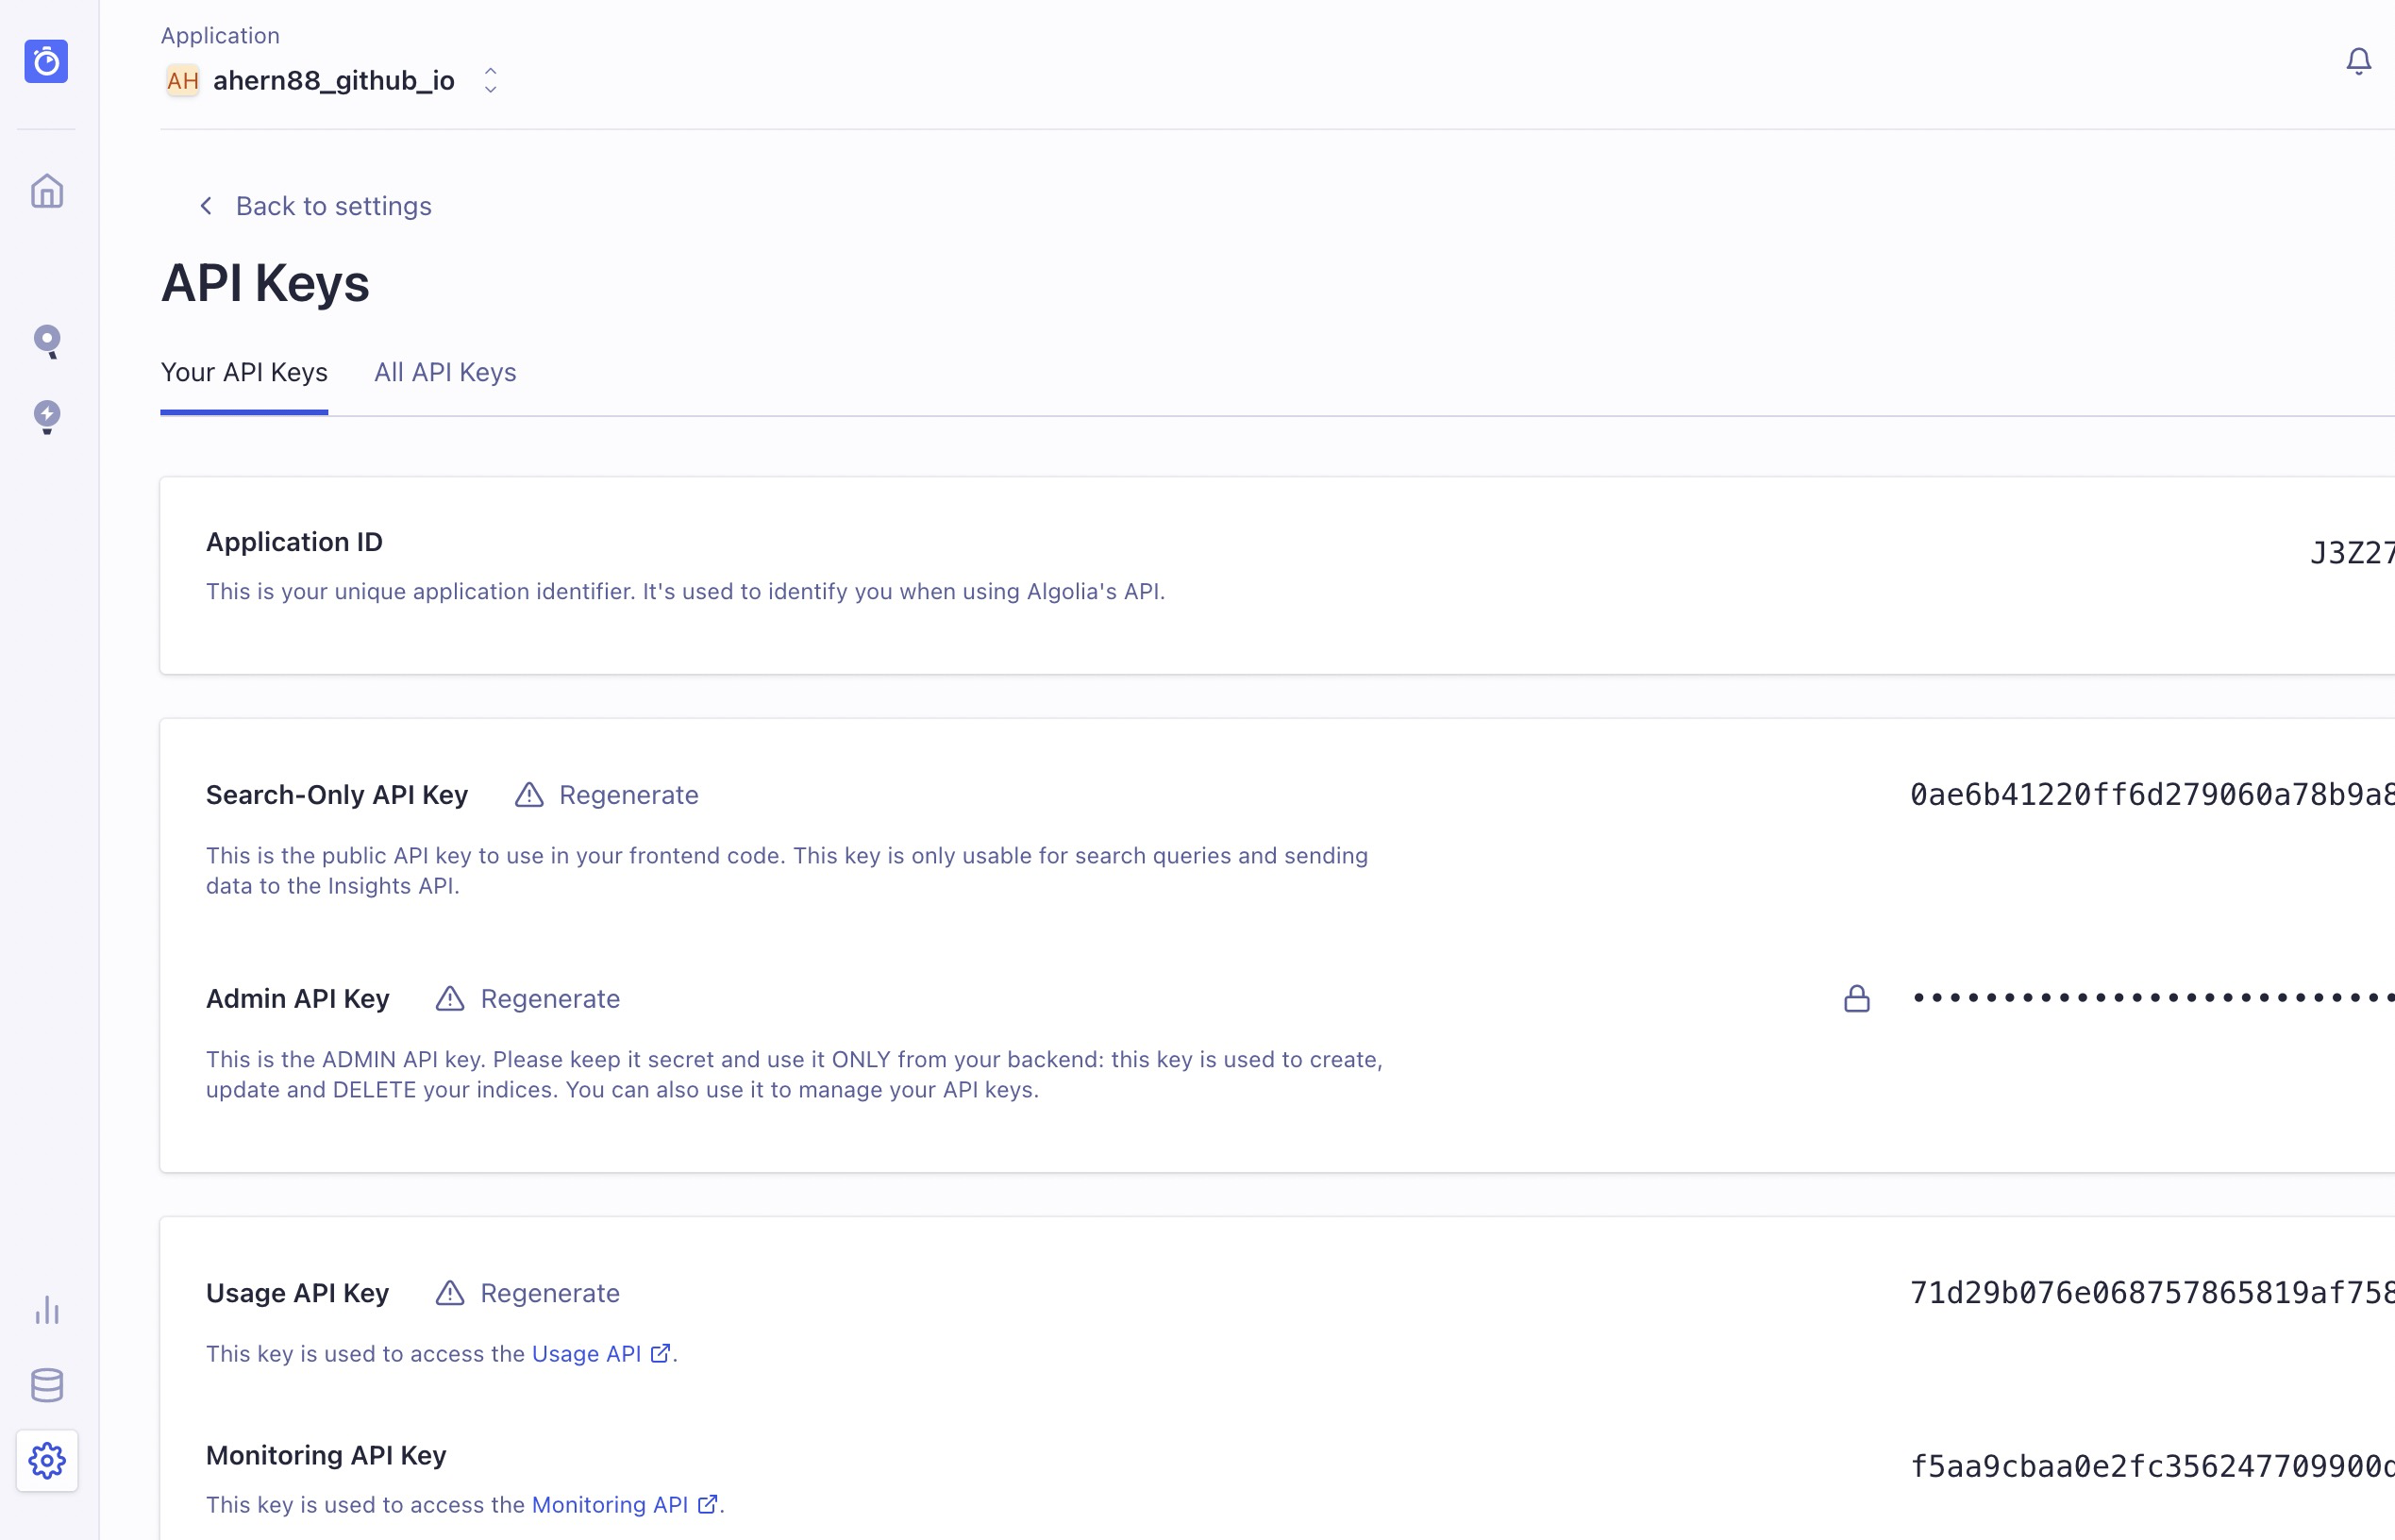
在根目录下_config.yml配置文件下新增如下信息:
# 搜索模块
algolia:
  applicationID: 'J3Z2******'
  apiKey: '4eaf4c93378e153e**************'
  indexName: 'post_index'
aomori_search_algolia: true
每次发布新博文后,都需要执行如下命令生成索引信息
$ export HEXO_ALGOLIA_INDEXING_KEY=4eaf4c93378e153e**************
$ hexo algolia
INFO  Validating config
INFO  [hexo-algolia] Testing HEXO_ALGOLIA_INDEXING_KEY permissions.
INFO  Start processing
INFO  [hexo-algolia] 3 records to index (post, page).
INFO  [hexo-algolia] Indexing chunk 1 of 1 (3 records)
INFO  [hexo-algolia] Indexing done.
这样搜索功能就安装好了~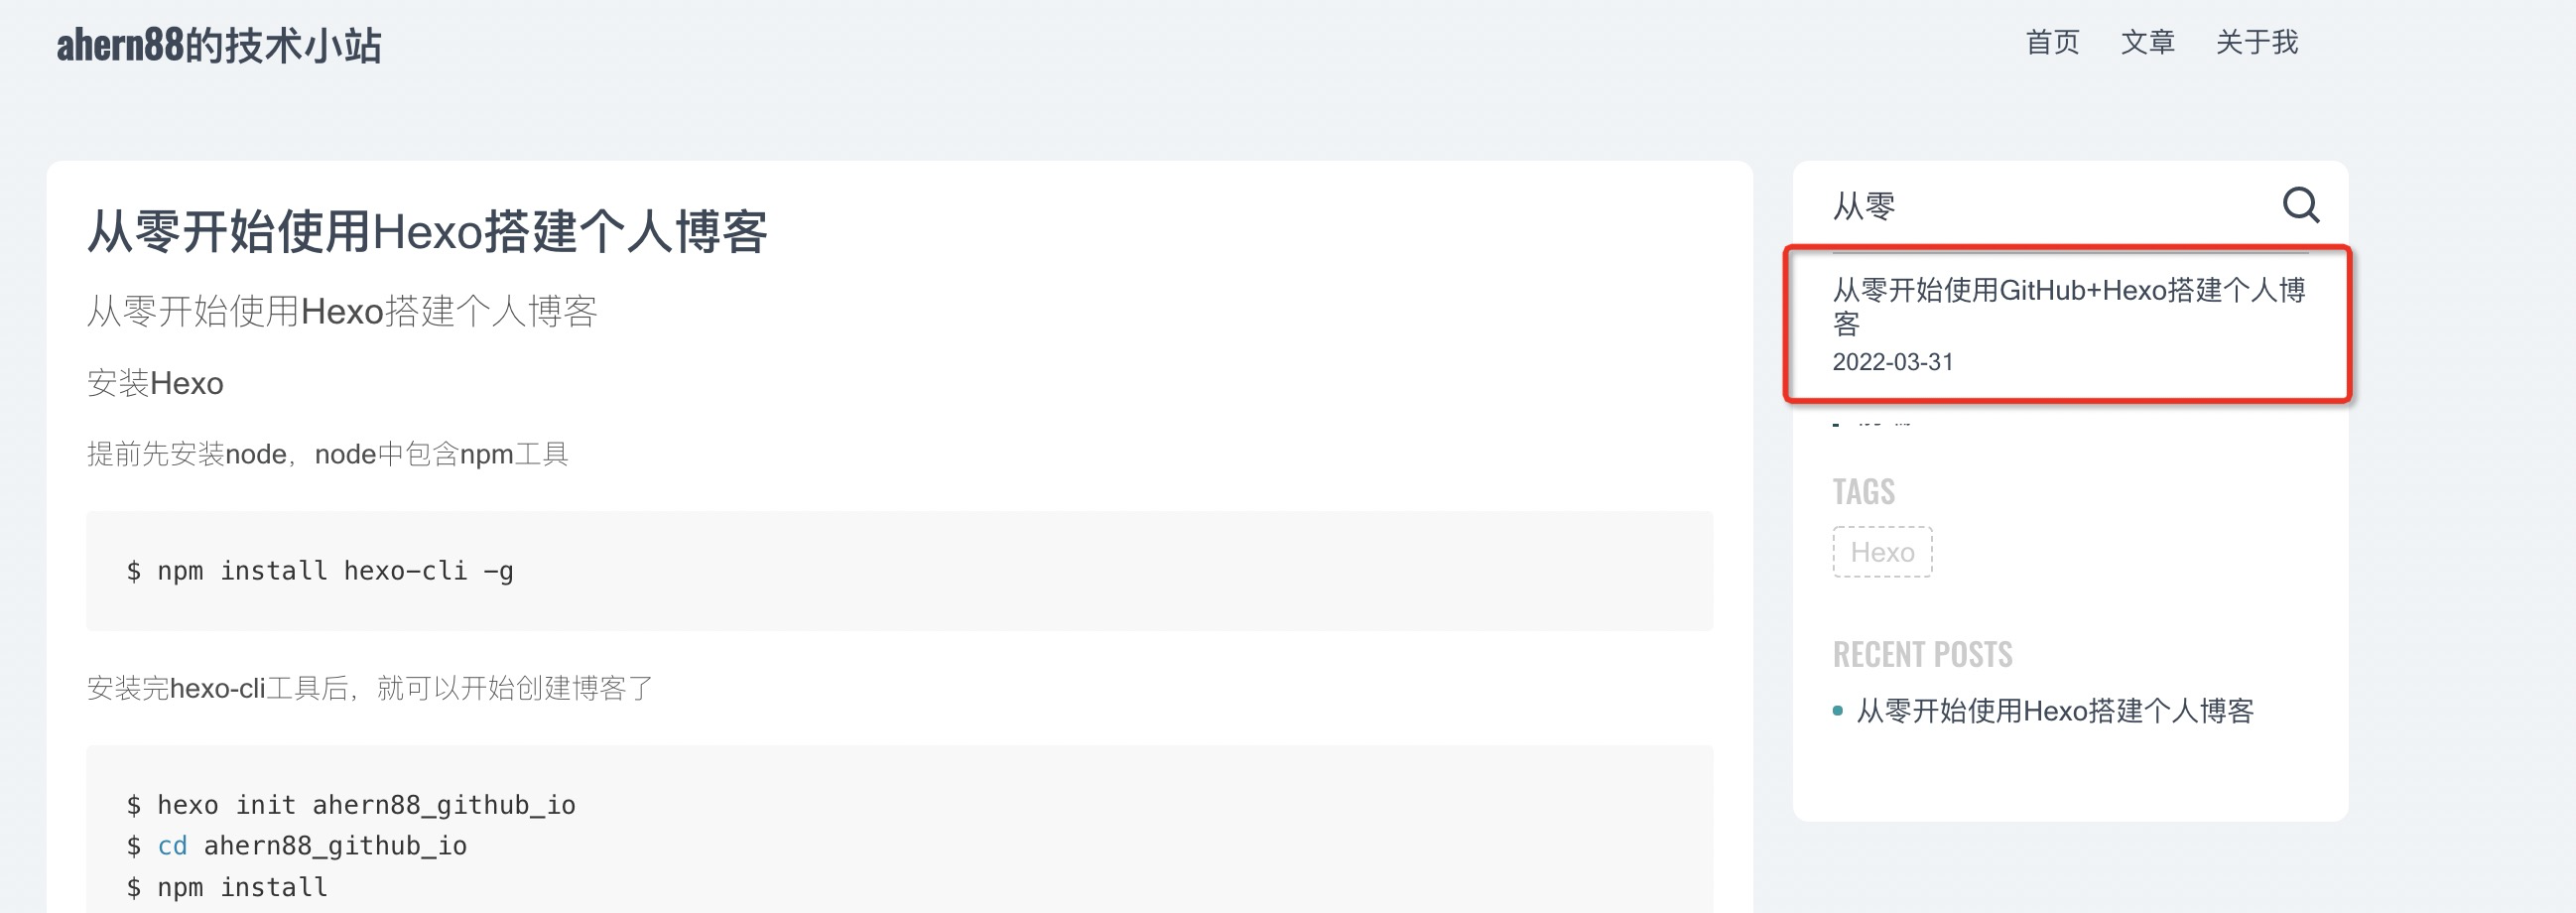
3. 评论功能
评论功能采用giscus,这是一个天才项目,数据源存储在github(什么鬼),对github里针对项目有一个discussions的功能,giscus完全基于它来实现。
首先我们要创建一个github空的项目
然后开启discussions功能(进入工程的settings页面)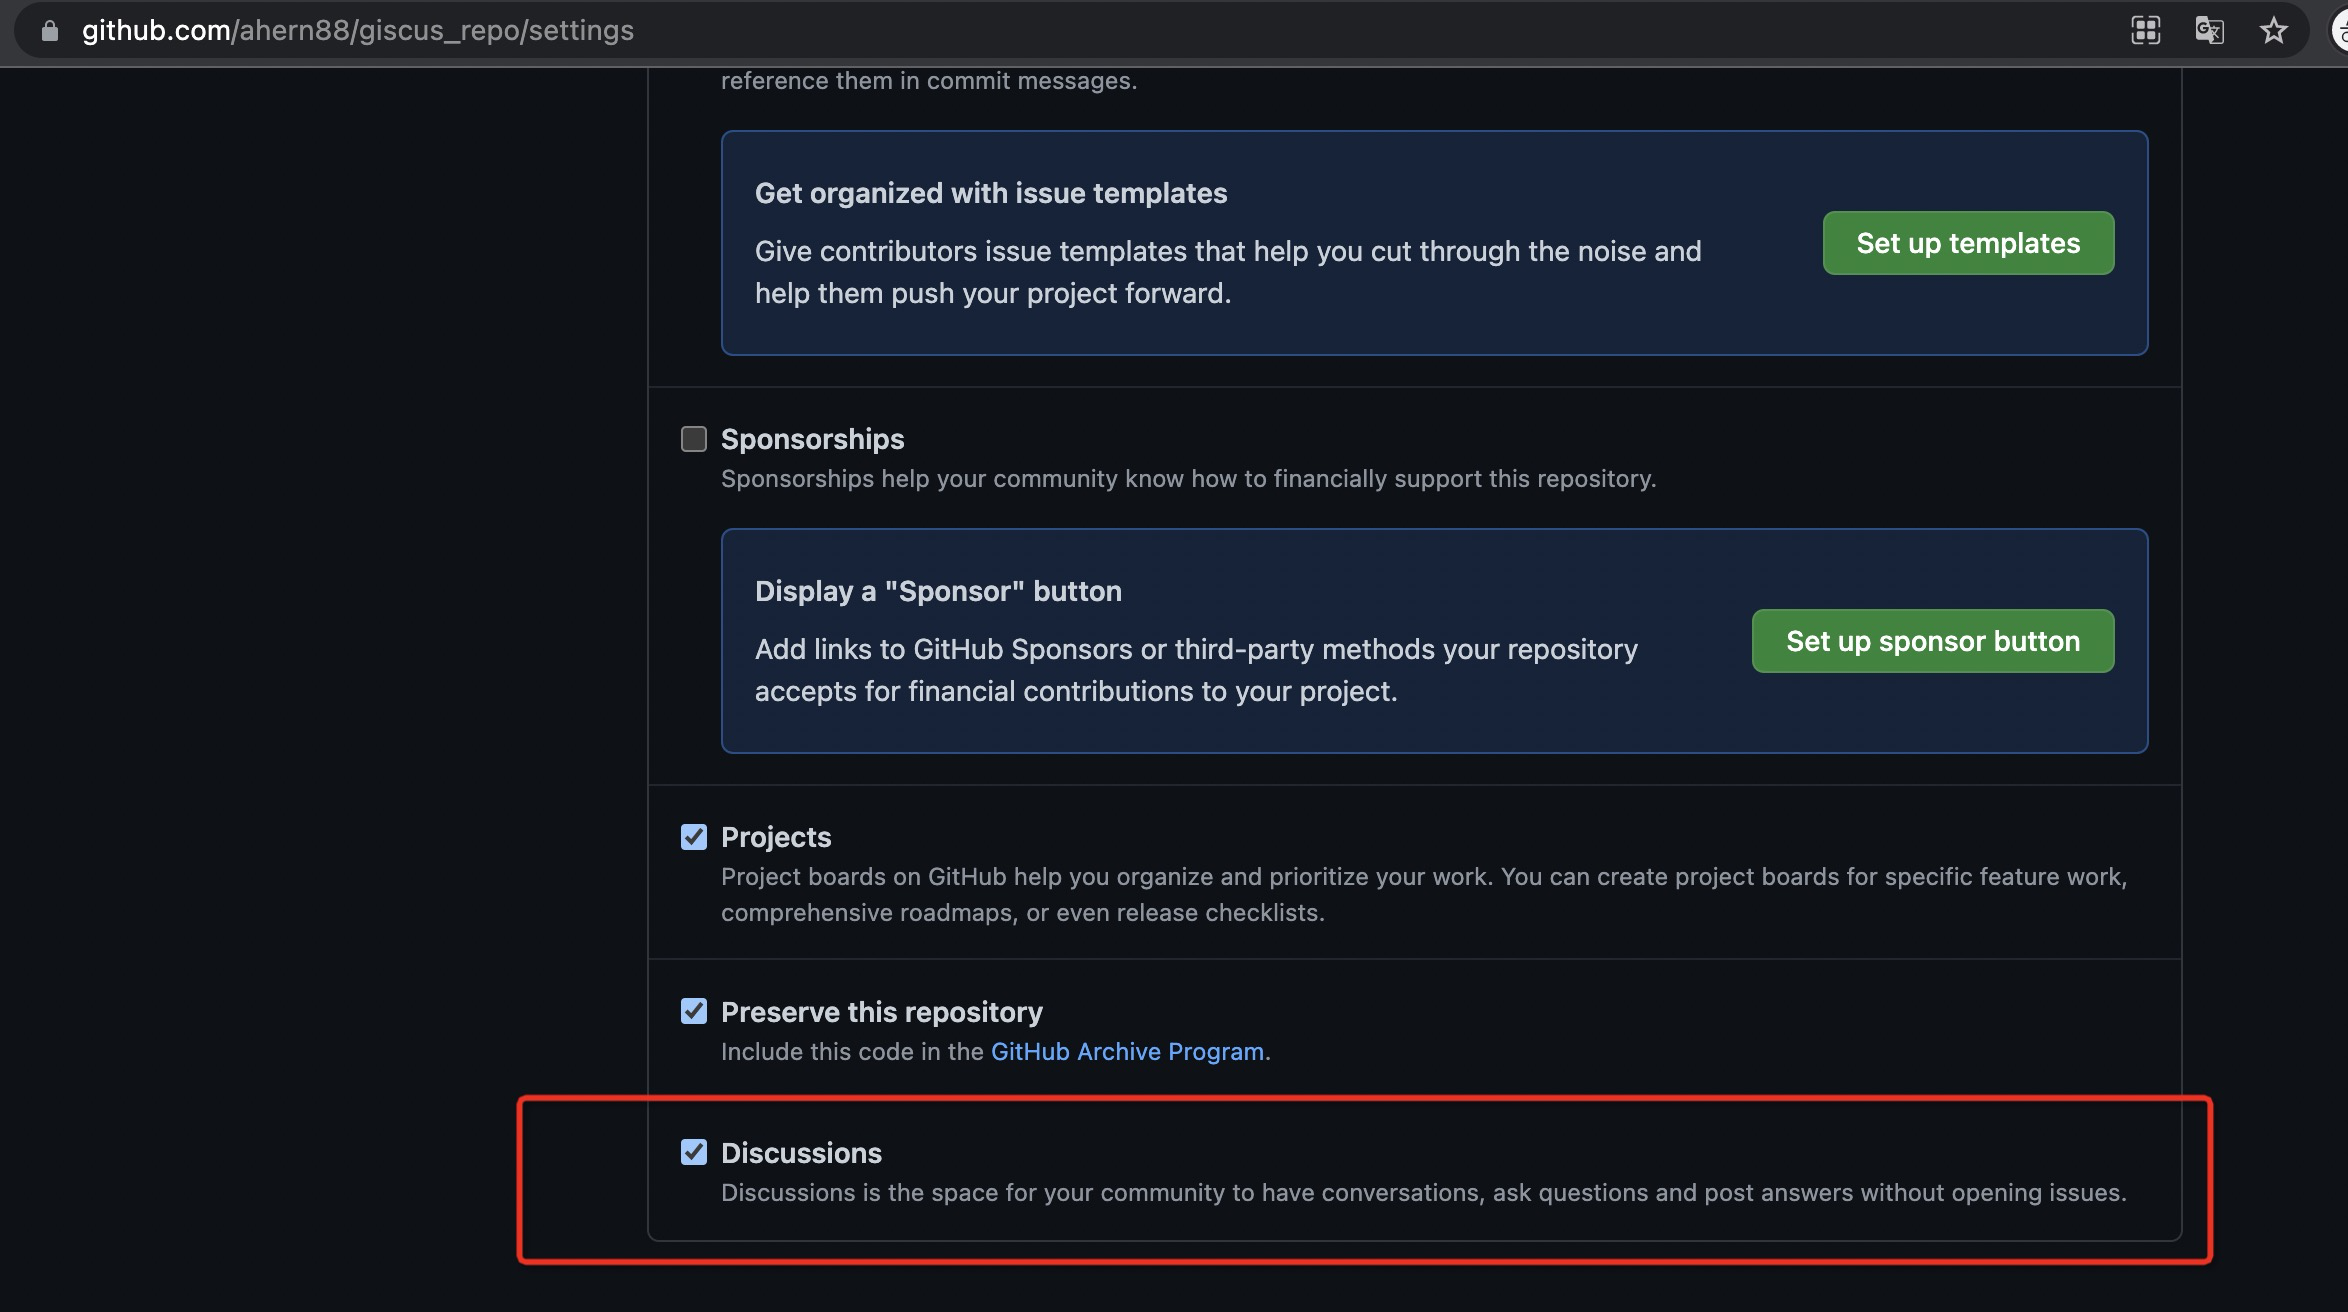
然后在github中安装giscus的app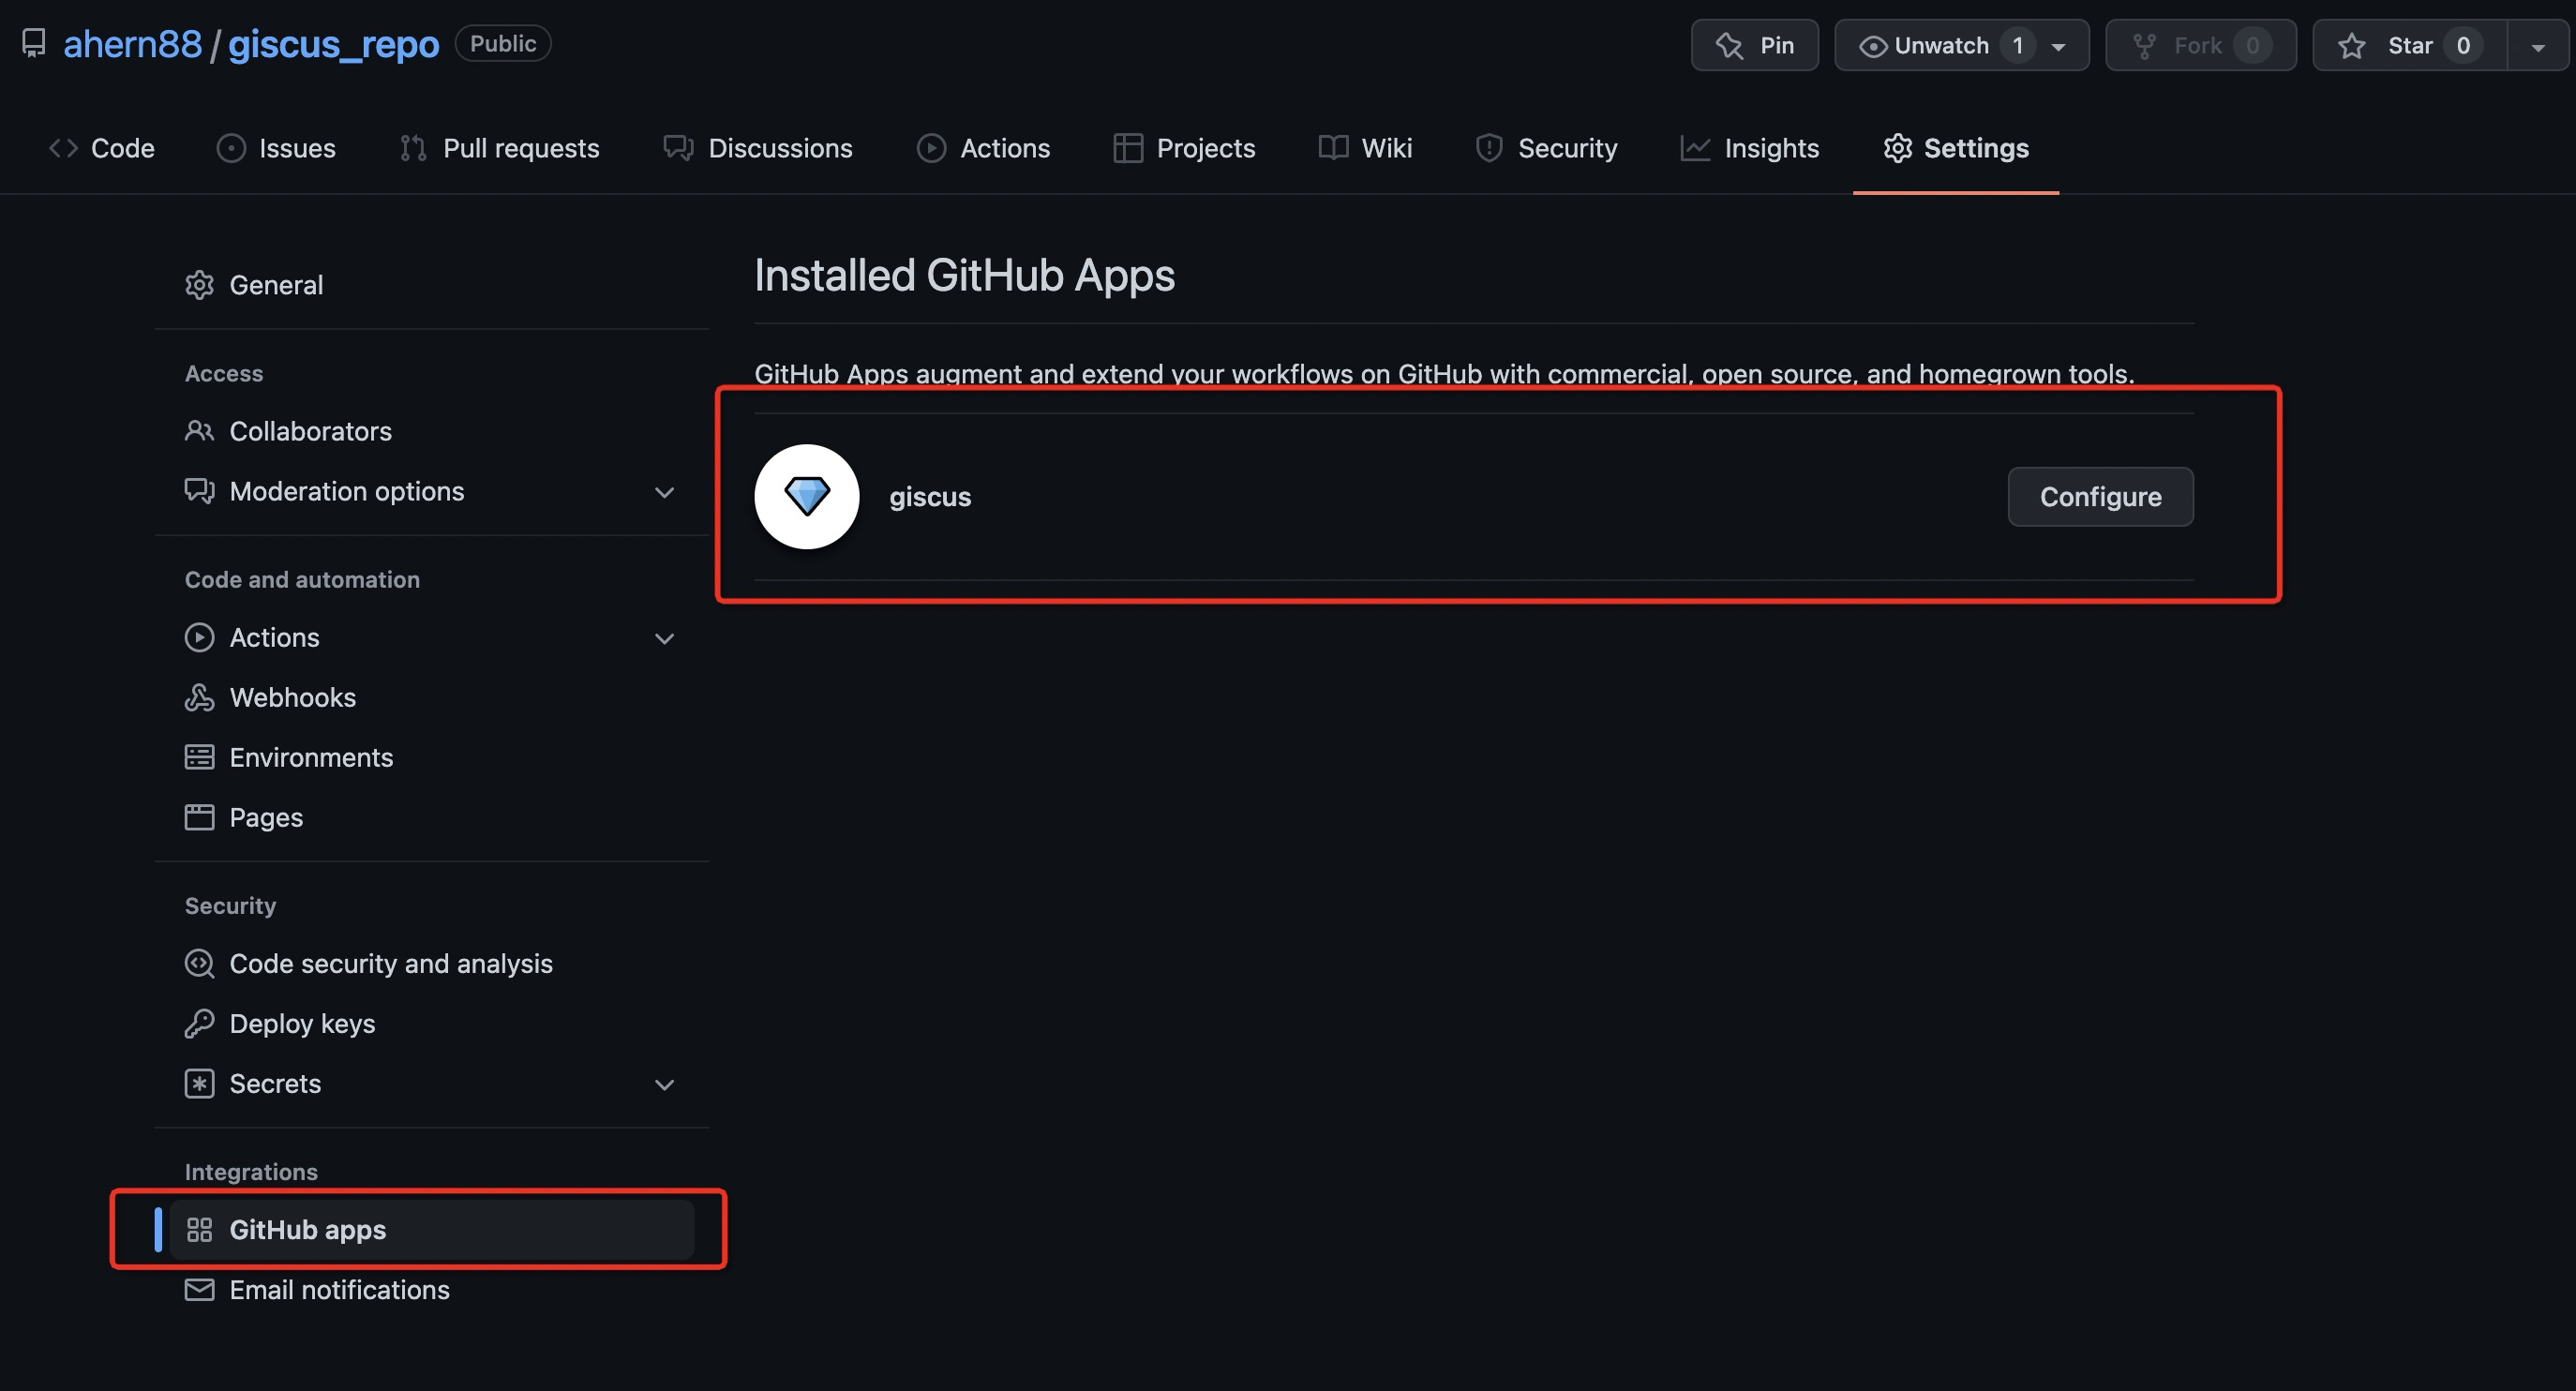
最后修改_config.yml的配置,完成giscus的配置
# 评论模块
aomori_giscus:
  enable: true
  repo: 'ahern88/giscus_repo'
  repoId: 'R_kgDOHGTAUg'
  category: 'Announcements'
  categoryId: 'DIC_kwDOHGTAUs4COWxa'
  mapping: "pathname"
  reactionsEnabled: 1
  emitMetadata: 0
  theme: 'light'
  lang: 'zh-CN'
inputPosition: 'top'里面的参数如何获取?进入giscus.app站点,按照操作填写资料就能获取到参数
<script src="https://giscus.app/client.js"
        data-repo="ahern88/giscus_repo"
        data-repo-id="R_kgDOHGTAUg"
        data-category="Announcements"
        data-category-id="DIC_kwDOHGTAUs4COWxa"
        data-mapping="pathname"
        data-reactions-enabled="1"
        data-emit-metadata="0"
        data-input-position="bottom"
        data-theme="light"
        data-lang="zh-CN"
        crossorigin="anonymous"
        async>
</script>
4. 统计分析
使用百度统计,能帮助你将站点做的更好,让你更了解站点的流量情况。
第一步是创建站点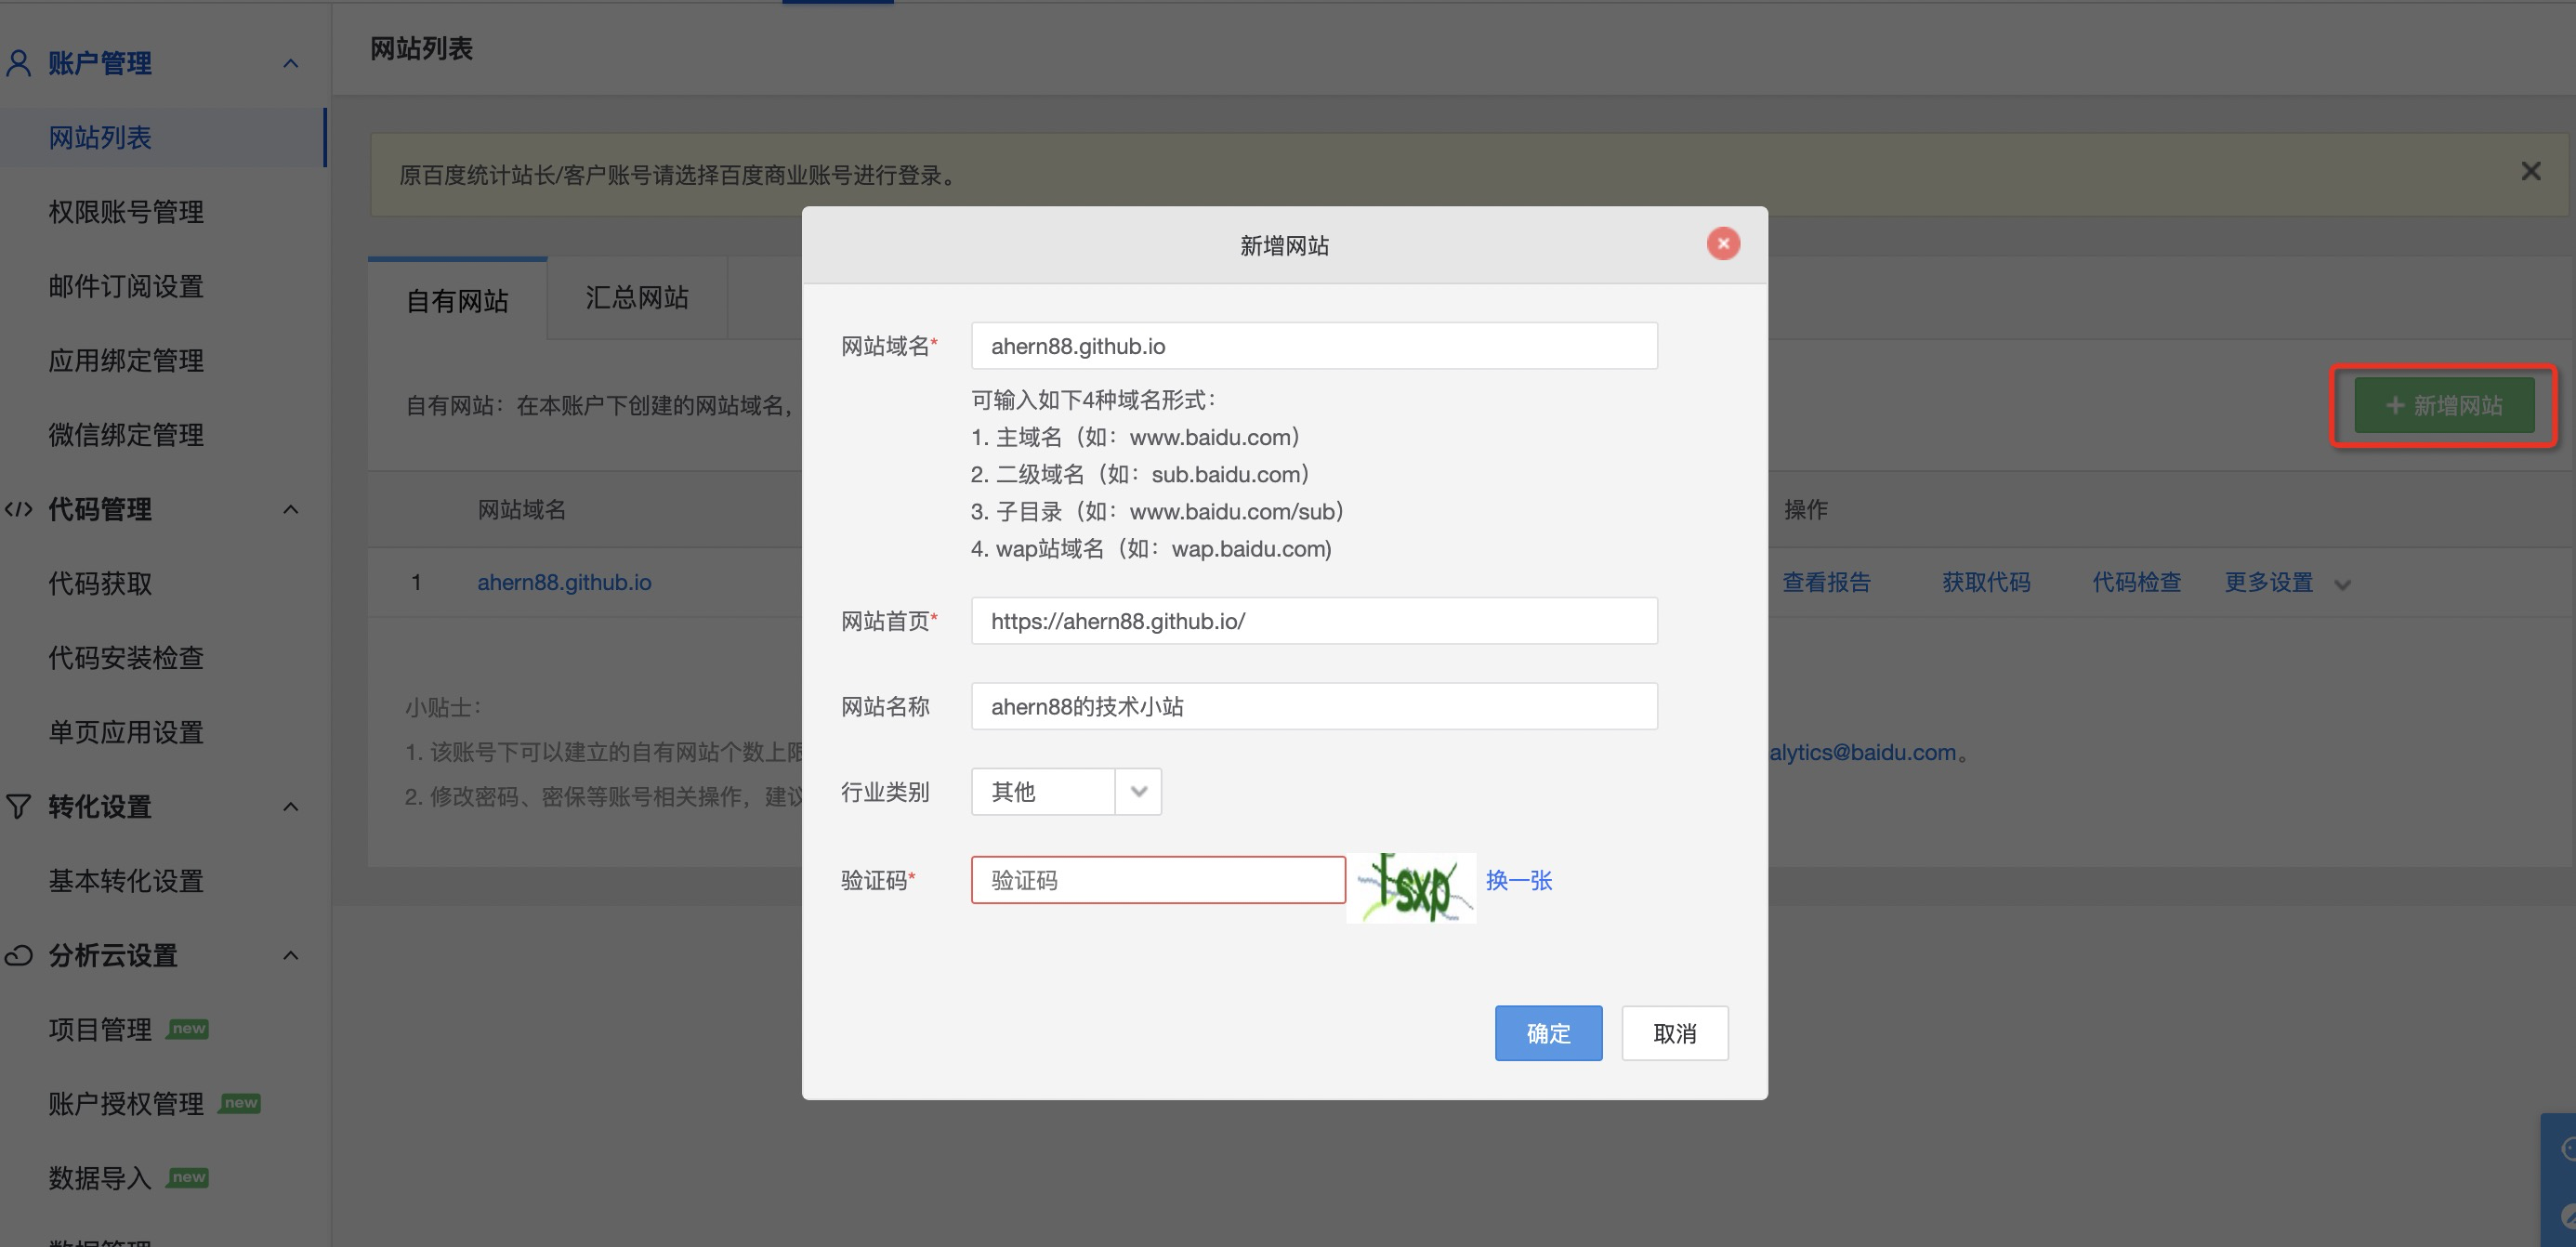
获取网站对应的key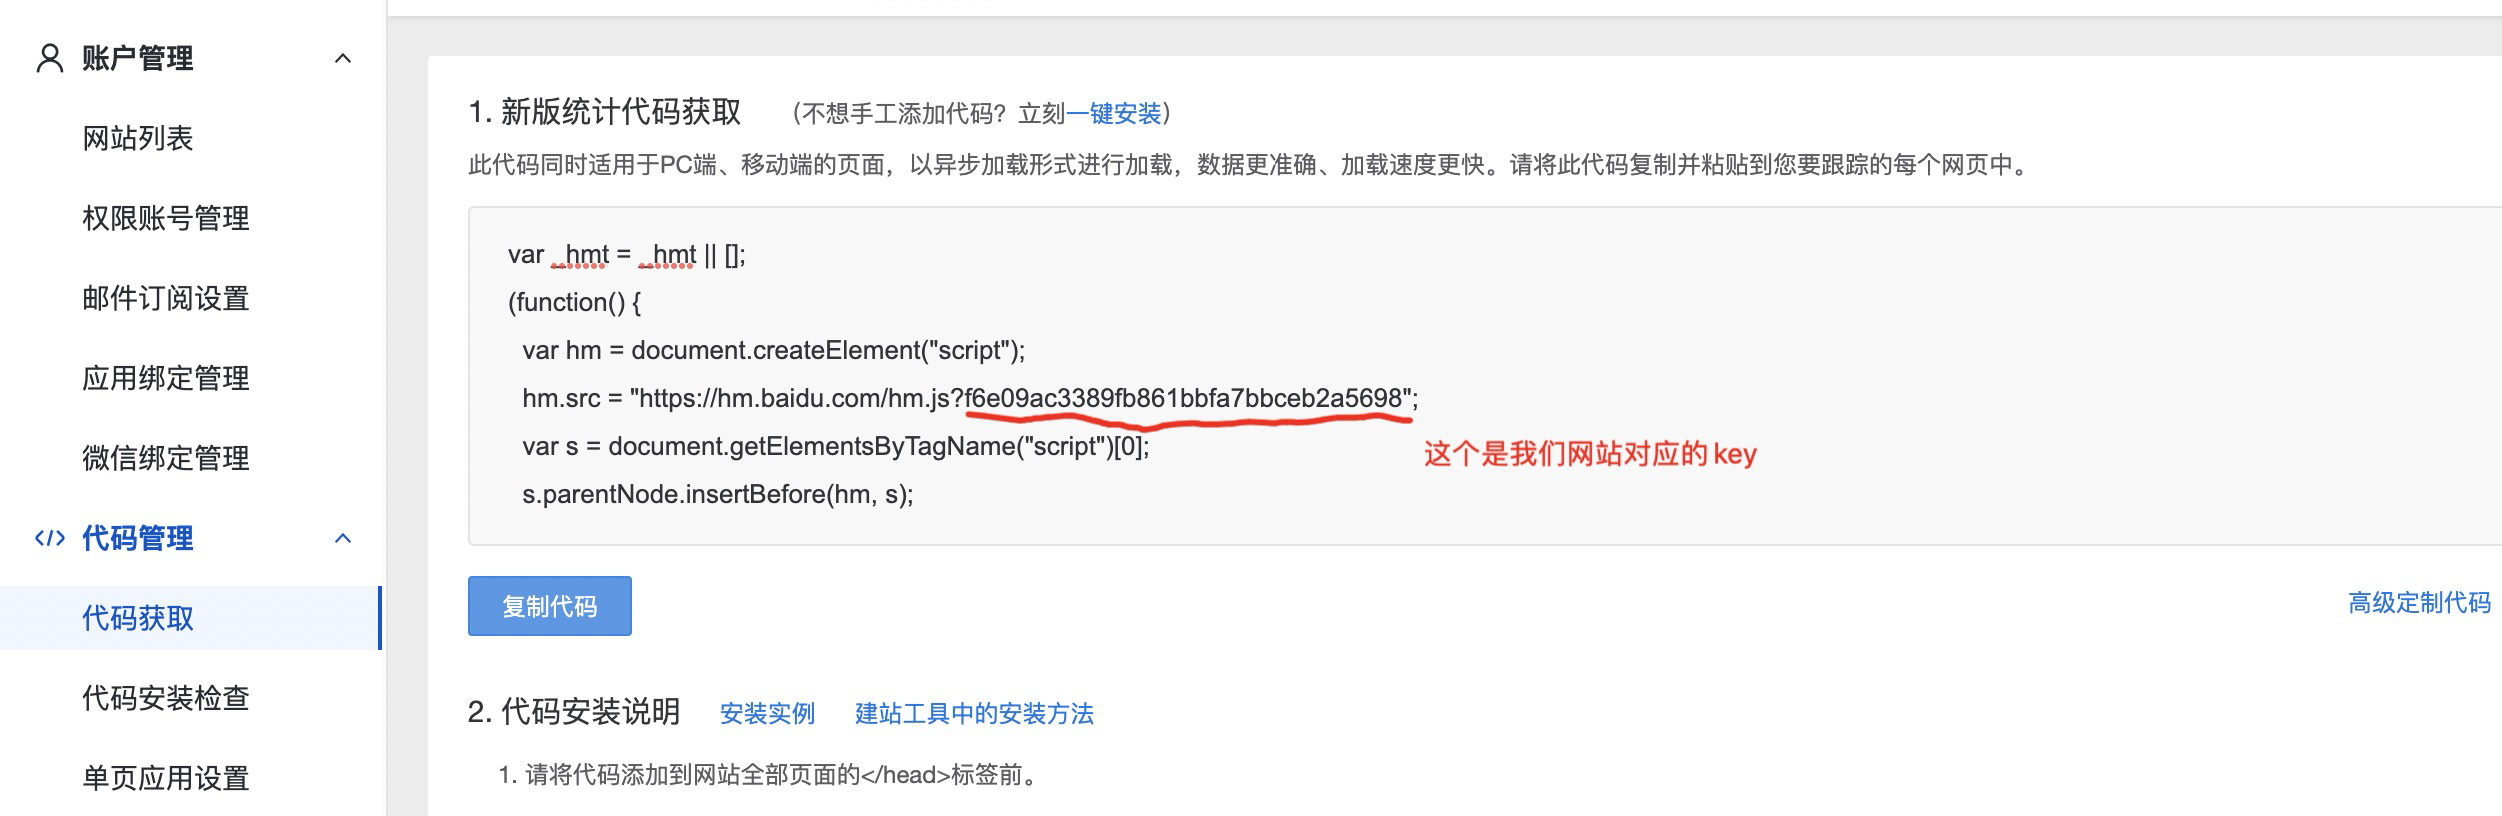
修改blog根目录下的_config.yml信息,新增如下配置(前提是你使用的aomori主题)
# 百度统计
aomori_baidu_analytics: 'f6e09ac3389fb861bbfa7bbceb2a5698'
到这里,统计模块就已完成,上线后查看统计分析信息
5. 写博客推荐的工具与问题
如何方便的做图片维护与管理?
有比较多的方式,比如使用Typora+iPic实现,但有一个风险,万一iPic服务器收费了或挂了,或许你的图片一去不复返了,最简单的方式是将图片存储在GitHub中,这样免费也省事,配合Typora工具目前真的是天衣无缝。
先在blog工程source目录下创建images文件夹,如下:
$ cd ahern88_github_io/source
$ mkdir images
配置Typora工具,将粘贴过来的图片自动上传到该目录下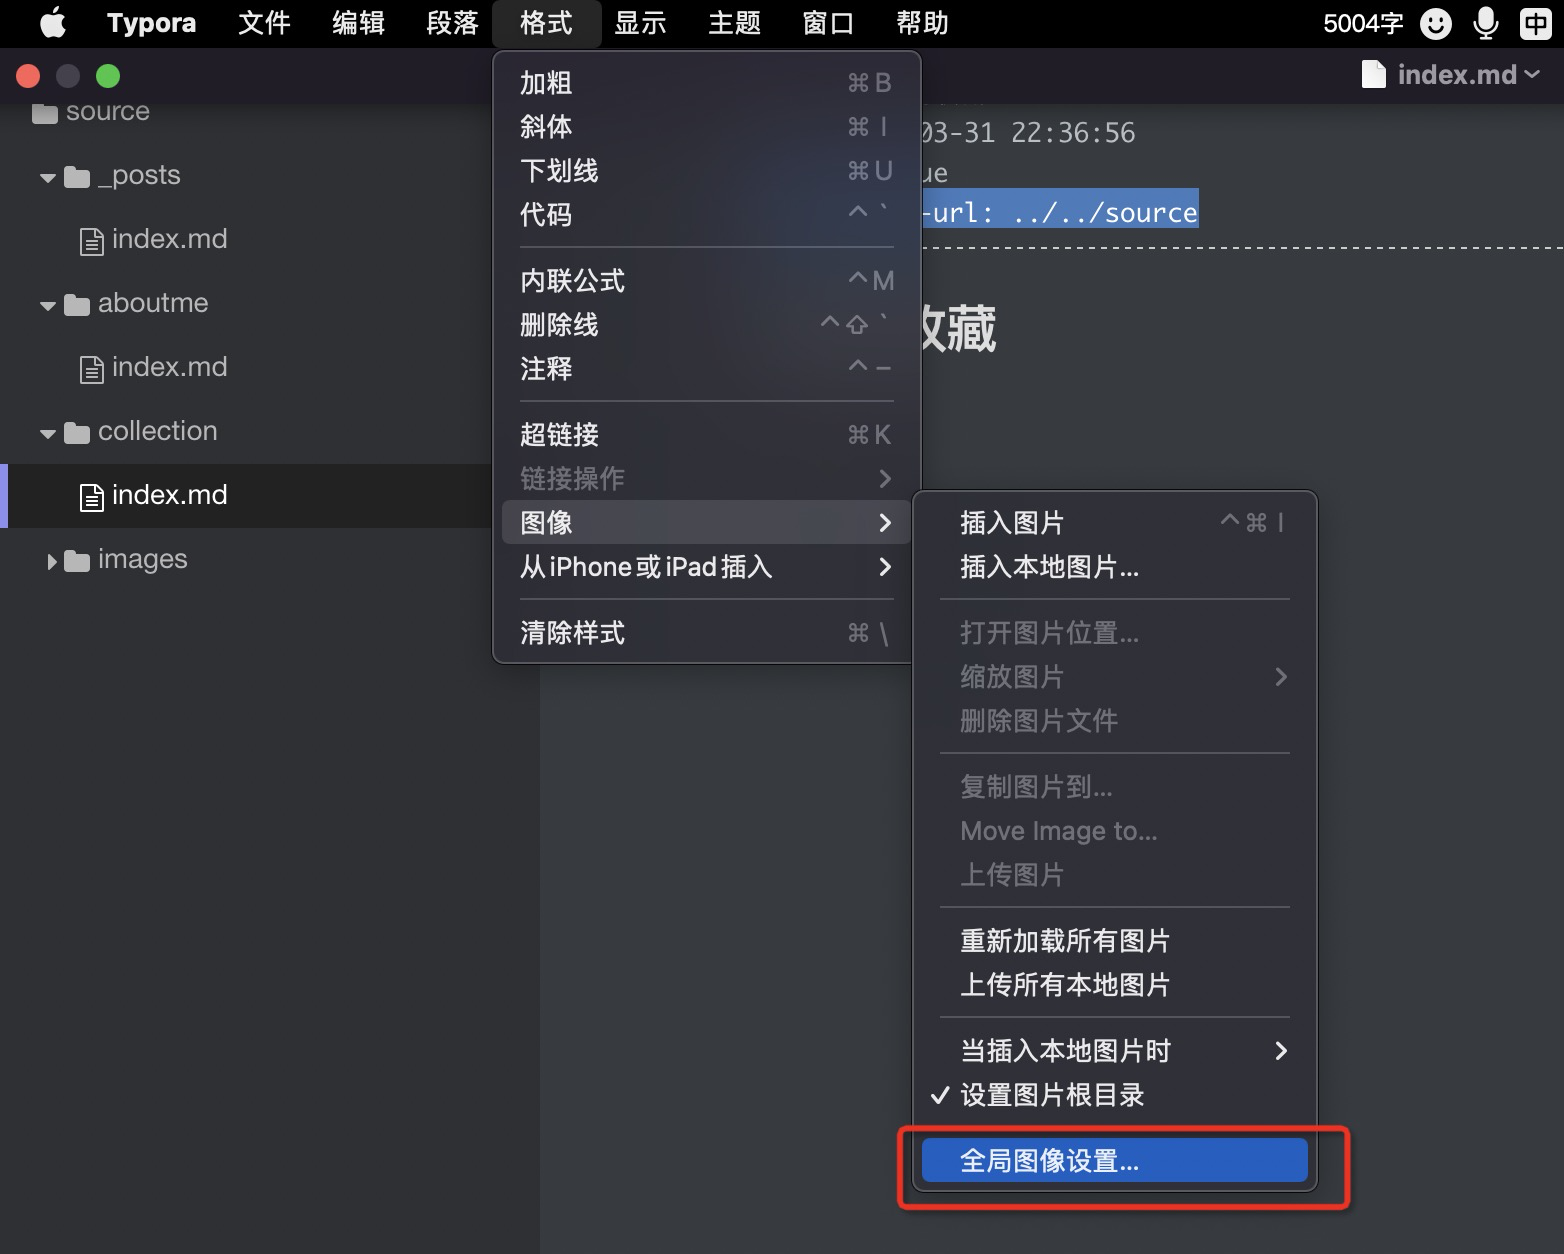
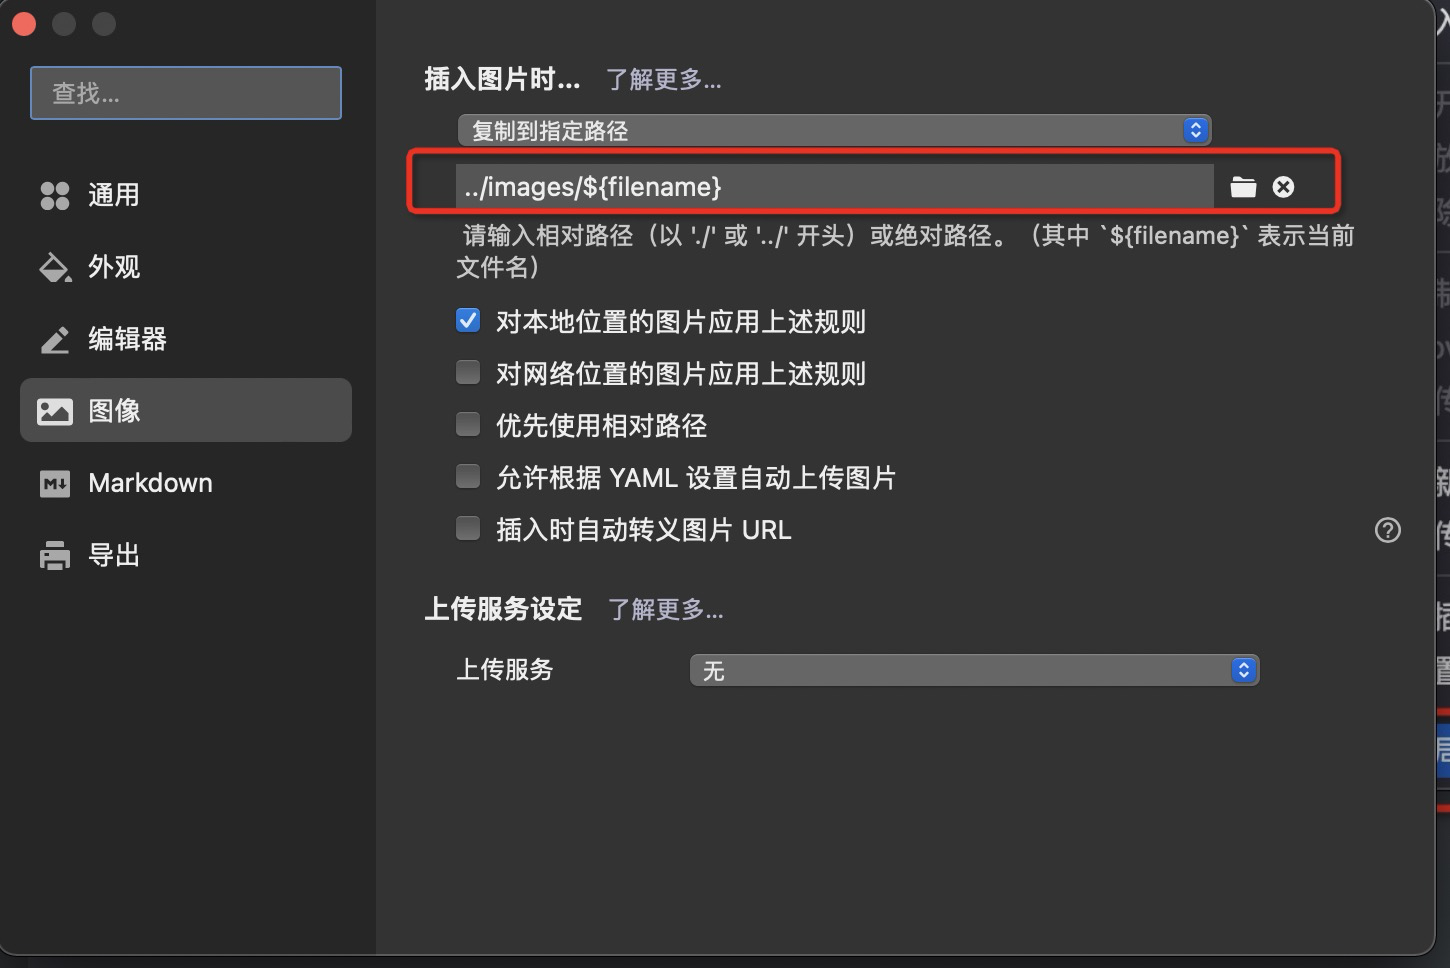
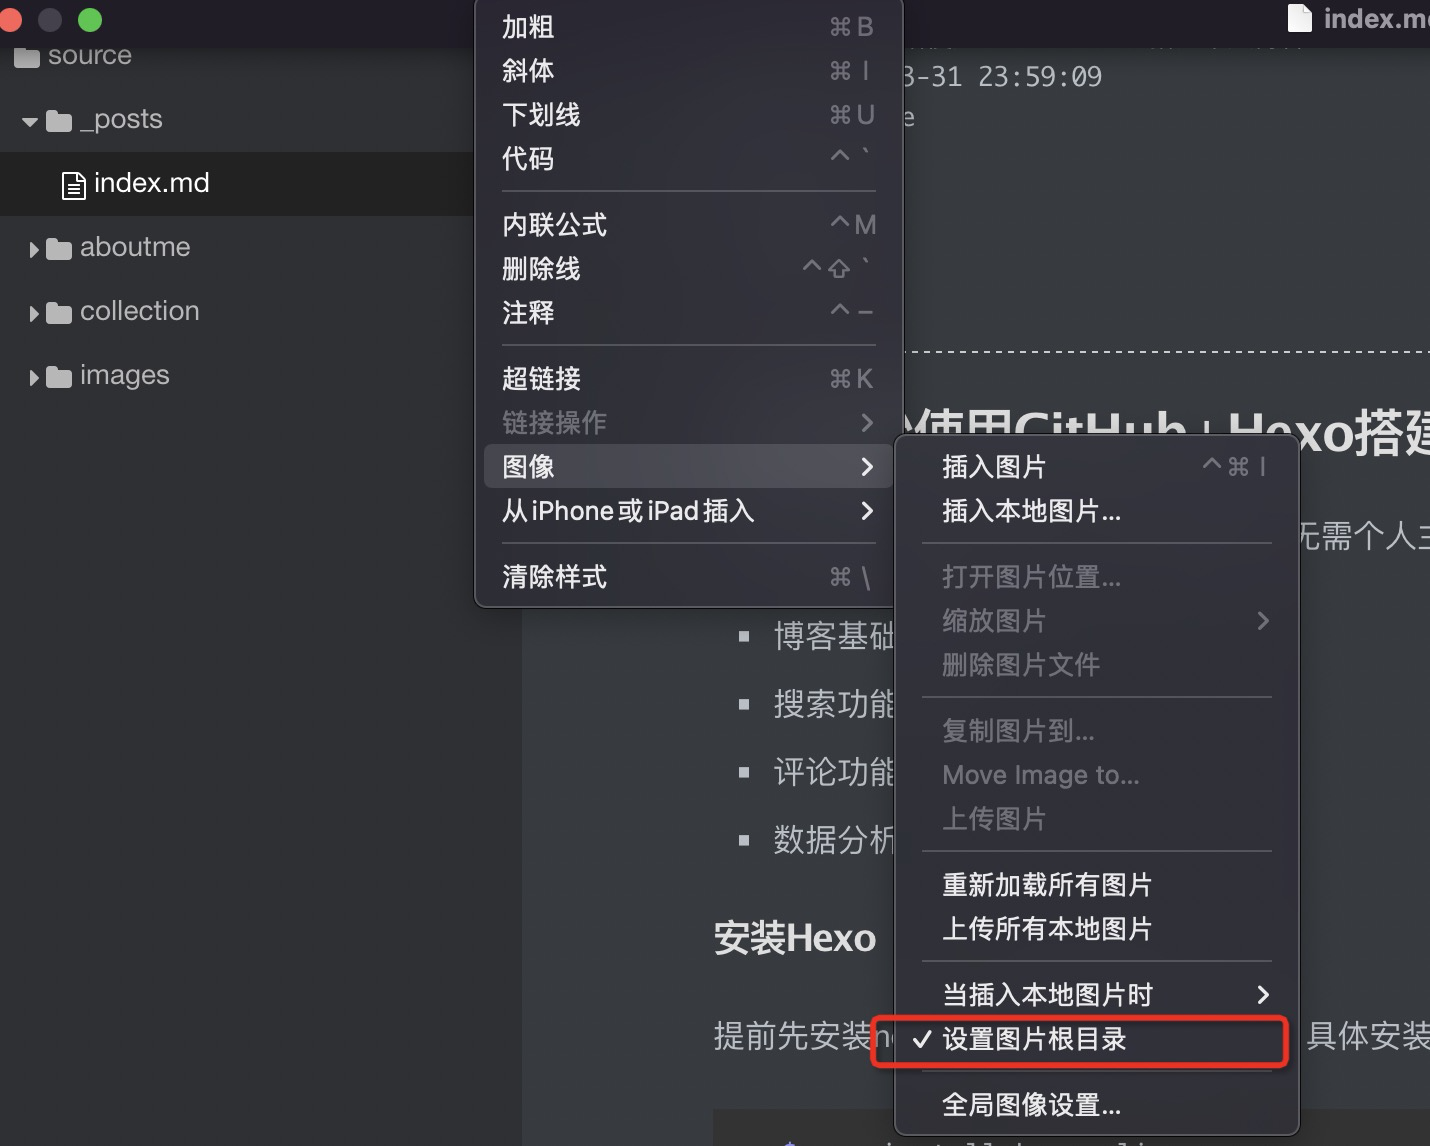
这样,直接从剪贴板粘贴过来的图片会自动生成到images文件夹中,而images文件夹会被hexo打包至web项目的根目录下,通过/images/xxx.png就能直接访问到,非常完美。
6. 发布博文
最好将博客的源文件存放在github上维护,这样每一步操作都有记录,而且数据不会丢,先在github中创建ahern88_github_io项目
$ cd ahern88_github_io
$ git init
$ git remote add origin https://github.com/ahern88/ahern88_github_io.git
$ git add .
$ git commit -m 'init blog'
$ git push -u origin main
创建文章
$ cd ahern88_github_io
$ hexo new post helloworld #这里会在source/_posts下创建helloworld.md文件,你的博文就写在该markdown中
创建网站的github工程ahern88.github.io,并做Pages设置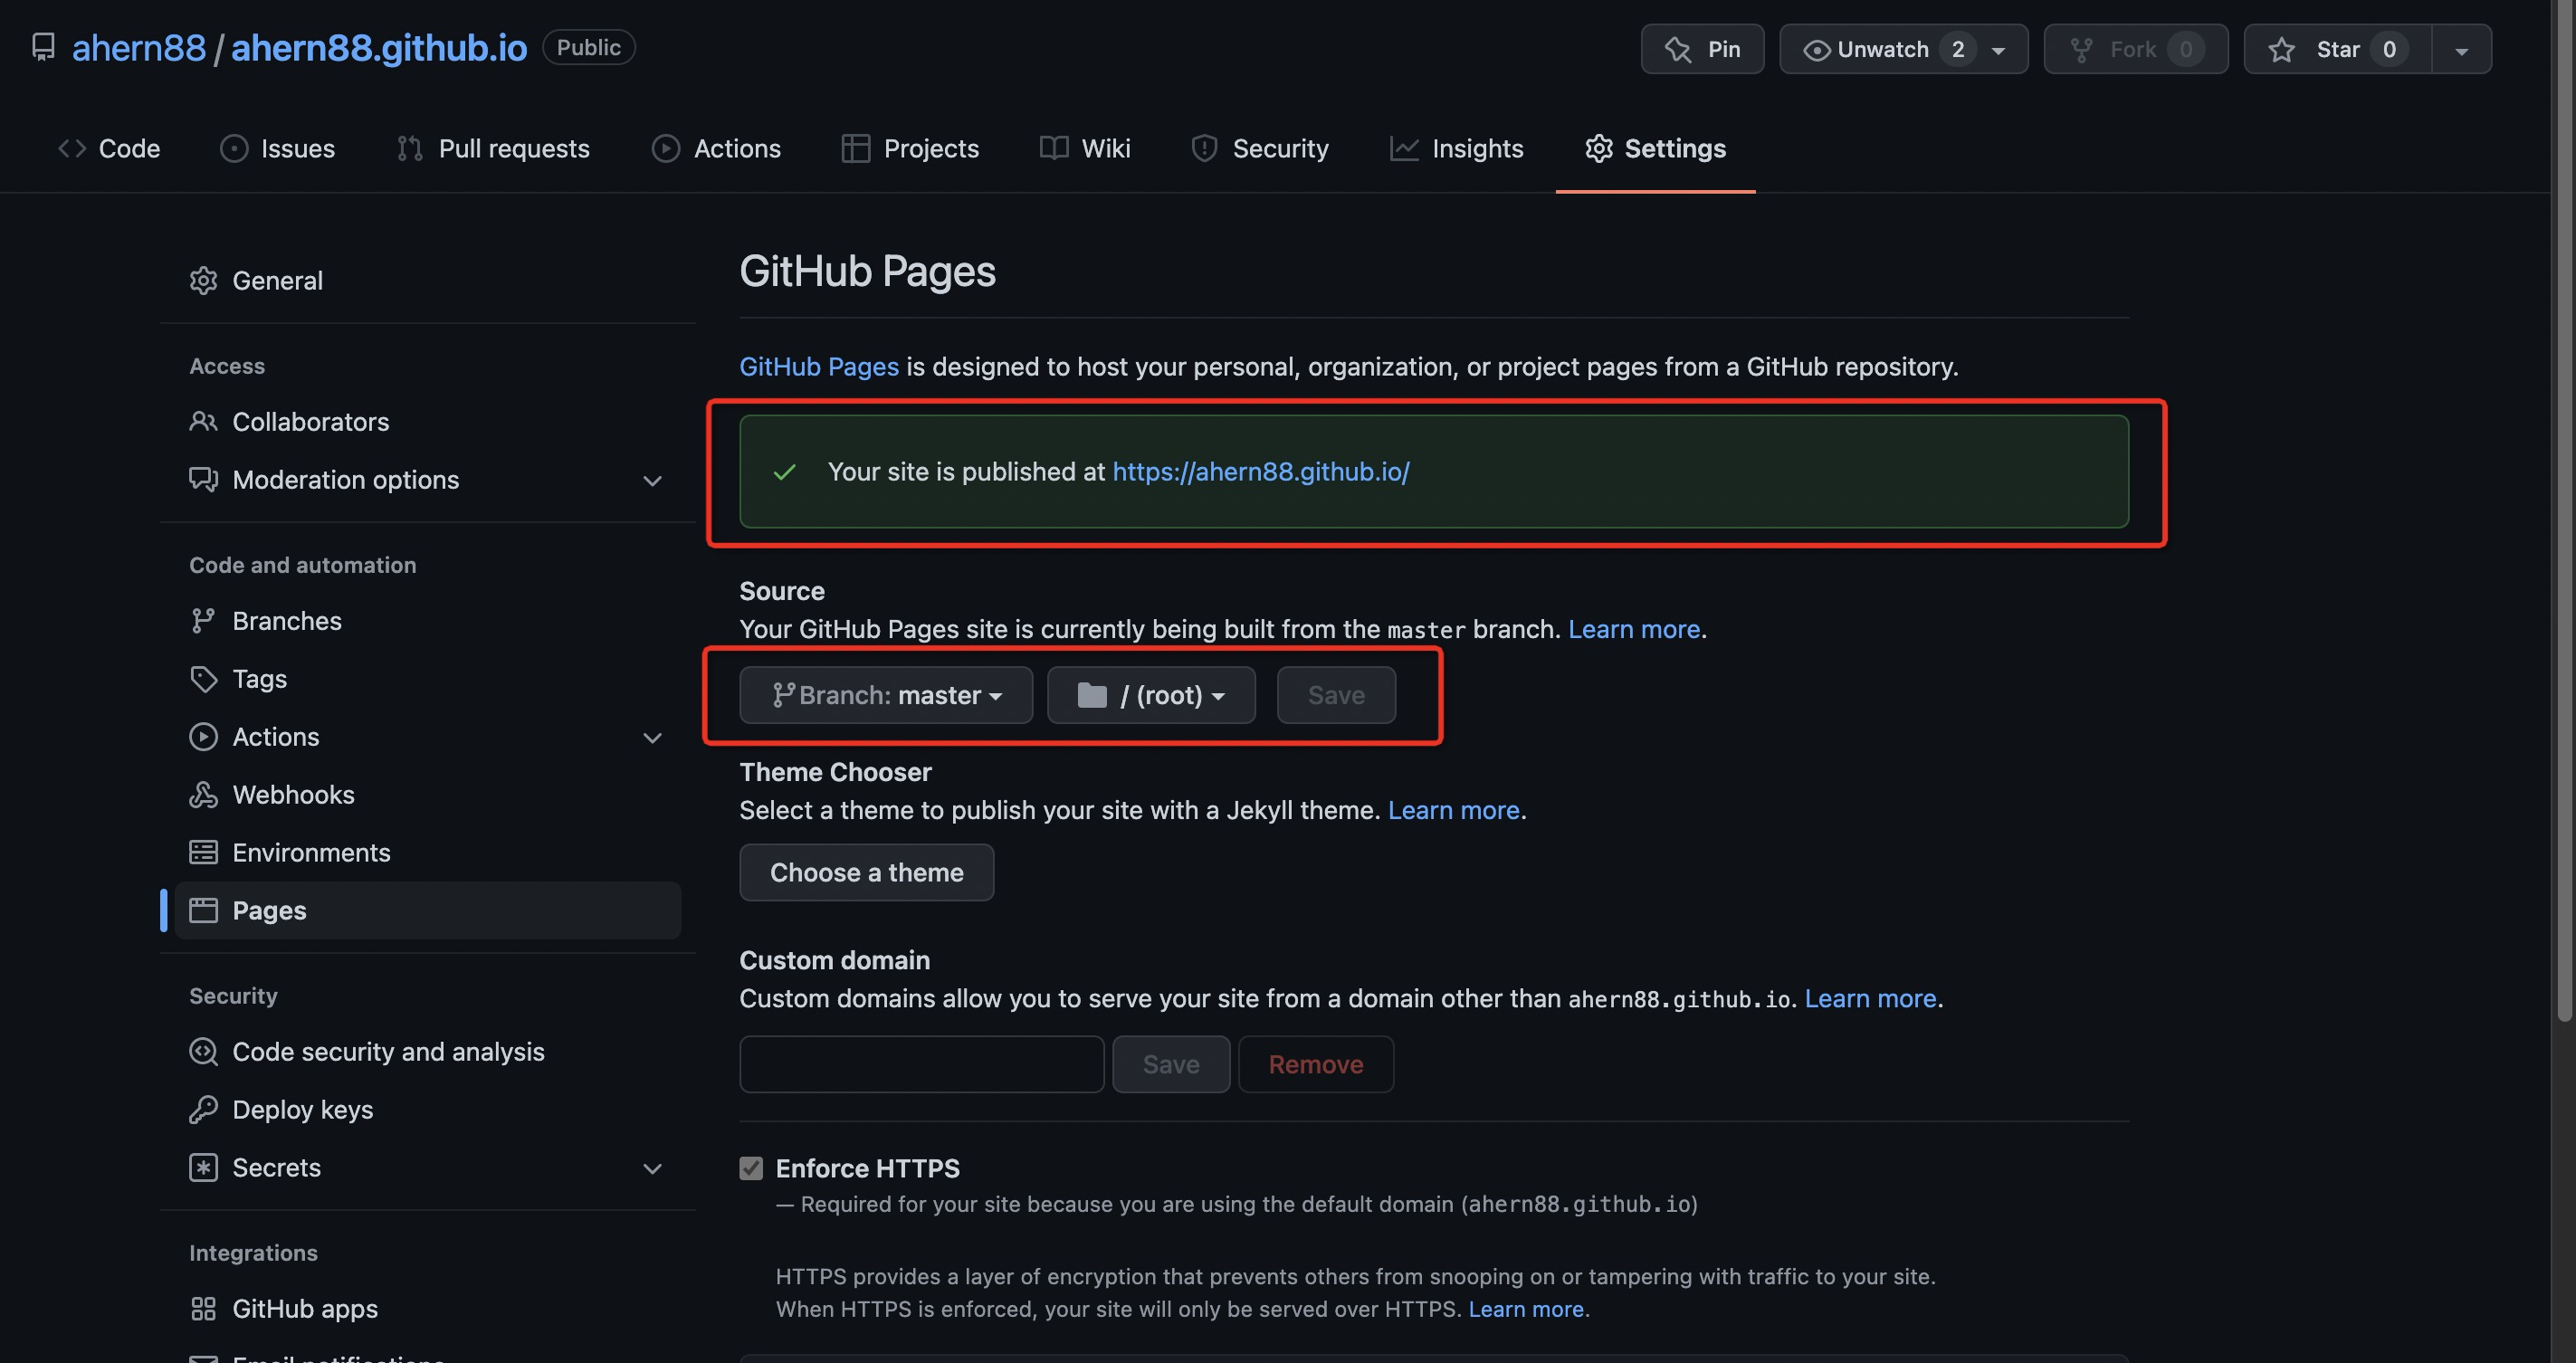
web网站仓库设置完之后,要将hexo工程的deploy信息指向ahern88.github.io工程,修改_config.yml配置
# Deployment
## Docs: https://hexo.io/docs/one-command-deployment
deploy:
  type: 'git'
  repo: 'git@github.com:ahern88/ahern88.github.io.git'
  branch: master
确保当前客户端的ssh key在github中有配置,不然deploy会出错
$ hexo clean # 清除数据等信息,防止内容发布不上去
INFO  Validating config
INFO  Deleted database.
$ hexo algolia # 更新搜索索引信息
$ hexo deploy
INFO  Validating config
INFO  Start processing
INFO  Files loaded in 144 ms
INFO  Generated: collection/index.html
INFO  Generated: 2022/03/31/index/index.html
INFO  Generated: dist/custom.js
INFO  Generated: assets/algolia/algoliasearch.js
INFO  Generated: images/index/image-20220401005713496.png
INFO  50 files generated in 80 ms
INFO  Deploying: git
INFO  Clearing .deploy_git folder...
INFO  Copying files from public folder...
INFO  Copying files from extend dirs...
[master a8df122] Site updated: 2022-04-01 02:19:08
 4 files changed, 58 insertions(+), 8 deletions(-)
Enumerating objects: 23, done.
Counting objects: 100% (23/23), done.
Delta compression using up to 4 threads
Compressing objects: 100% (6/6), done.
Writing objects: 100% (12/12), 2.05 KiB | 1.03 MiB/s, done.
Total 12 (delta 5), reused 0 (delta 0), pack-reused 0
remote: Resolving deltas: 100% (5/5), completed with 4 local objects.
To github.com:ahern88/ahern88.github.io.git
   56ef0d2..a8df122  HEAD -> master
Branch 'master' set up to track remote branch 'master' from 'git@github.com:ahern88/ahern88.github.io.git'.
这样你的博文就发布上去了,发布完成后会有2分钟左右的缓存,等过几分钟刷新查看效果。
7. 其他技巧
7.1 首页文章如何分段
只需要在文章内容中增加<!--more-->代码片段就能在首页不显示后面的内容,这个是hexo定义的,与主题无关。
7.2 新增favicon图标
将favicon.ico文件放入 source/images/ 文件夹下,然后在 _config.yaml中增加 favicon: images/favicon.ico 即可
8. 参考资料
- Hexo官方网站 https://hexo.io/zh-cn/
- Giscus官方站点 https://giscus.app/zh-CN